The New Mexican Green
OK, I admit it. I’m “addicted” to Green Chile. I didn’t really realize it for a while, but I haven’t lived in NM for well over 15 years (having grown up there) and it dawned on me about 8 years ago that one of my favorite aspects of returning for the occasional visit is … you guessed it … green chile!
New Mexicans adore the stuff. The state produces some 20 to
40 thousand tons of it per year, most of which is sold in-state. They put it on
everything. They eat it year round (though fall is peak chile
season).
Unlike most other chile (New Mexicans do not use the plural form of the word), New Mexican chile is not usually bred for heat, but rather for flavor. Some types are in fact quite hot, and all types have some heat, but it is that distinct flavor and aroma that, I’m convinced, makes it addictive. Green chile will eventually turn red, if left on the plant or sitting out at room temperature. Personally, I also love the flavor of the “orange” stage – just after the chile starts turning red but before it begins to dry out.
 But
you can’t enjoy NM green chile with the skin on!
But
you can’t enjoy NM green chile with the skin on!
Alas, here in the heart of
Roasting Green
The two most common methods for roasting small numbers of peppers are grilling and oven broiling. The idea is simple: get the grill or oven as hot as possible and place the chile as near as practical to the heat source. Rotate the peppers a few times until they blister and blacken and in about 10 minutes they’ll be done. Being an engineer, I don’t like having to constantly tend to my peppers – I want them to roast without my constant intervention! The solution was simple: imitate the rotating cage idea on a small scale using a standard rotisserie motor and a gas grill.
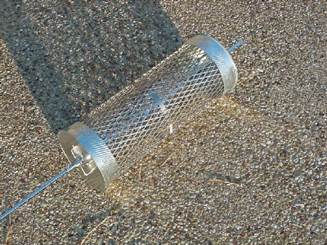
The roasting cage, shown below left, is about as simple as I can imagine: a sheet of 18-guage grill steel is cut to the proper length and width, and then rolled into a cylinder that fits into two 7” diameter aluminum chimney pipe caps. (Usually you can find this stuff in local hardware stores.) NOTE: the grille steel has to be pre-bent approximately into the shape of cylinder before the pipe caps are put on. It will not naturally adopt a cylindrical shape if you simply roll it up and squeeze the chimney caps onto the ends. I did this by gently bending it by hand to a cylinder of diameter slightly larger than the pipe cap. (I realized too late that my driveway was not the proper place to take this picture.)
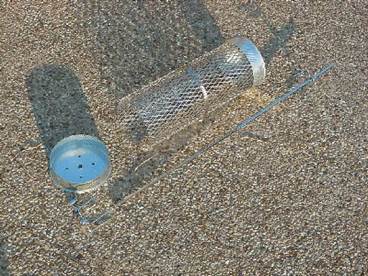
The cage is further encouraged to adopt the correct shape by placing a pipe clamp around the cage circumference in the middle. The clamp is “woven” in and out of the grille material to prevent it from sliding around. The clamp also allows me to remove one of the chimney caps for loading and unloading the chile without the cage springing open.
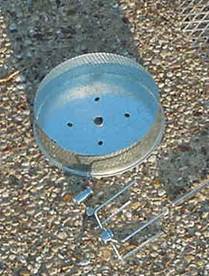
The close-up (above right) shows that the chimney cap has 4 holes drilled in it. The center one is for the rotisserie shaft, and the 4 satellite holes accept the 4 tines from the rotisserie stabilizer fork (the thing you use to spin a chicken on the rotisserie, for instance). The forks at each end clamp onto the shaft, and the whole assembly appears below.
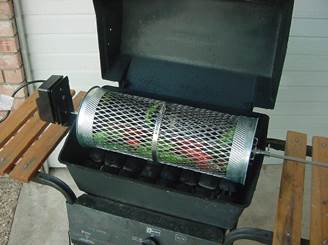
You can see the rotisserie motor on the picture above right. The whole contraption holds about 3 to 4 lbs of peppers, more if they’re small and less if they’re large.
Roasting Tips
- You want the peppers as close to the heat as possible, so the diameter of the cage and the placement of the center shaft should take the chile directly over the gas flame on the bottom of the rotation.
- Remove the ceramic brickettes if you have them – they get in the way of the flame.
- Turn the gas up to HI or even “Clean” if your grille has that setting. You want really big hot flames.
- I’ve discovered that keeping the lid open takes too long. Keeping the lid closed, however, causes the peppers to cook too much and fall apart (plus they’ll cook in a carbon-monoxide rich environment which is known to create carcinogens in some plants like tobacco). So I prop my lid open about 2 inches and then it only takes about 10 to 15 minutes to roast the chile.
- Roast batches of small and large peppers separately. Small ones will burn up in the time it takes large ones to roast properly.
- Cut the stems off. Some peppers’ stems will hook onto the cage, and those ones won’t turn.
- Check occasionally to see if a pepper is stuck in one of the chimney caps. It won’t roast without direct flame. Sometimes I have to poke at one with a small skewer to free it.
- TO RINSE OR NOT TO RINSE? Diehards will tell you that rinsing a roasted chile removes some of the flavor. While you shouldn’t have to rinse them to coax the skins off, I will sometimes rinse the inside of mine to get the seeds out, and remove some of the membranes (where all the heat is) for really hot peppers. (You thought I was a diehard? Pulease: go to NM during chile season to see the real freaks.)
Links
This section will develop as and when I have things to put here.
NOTE: I have noticed (and people have emailed me) that the big-box retailers no longer sell the grille metal (technically termed “expanded metal”) in the correct size. I have purchased expanded metal online from www.mcmaster.com (go to the bottom under raw materials), and in fact some people have told me they bought stainless steel instead of regular steel. This sounds like an excellent idea, as the acids from the chile quickly rusted my original non-stainless cage.
If you’re interested in chile roasting on a grand scale, check out McBroom Metal Works – this is only for hardcore fans!
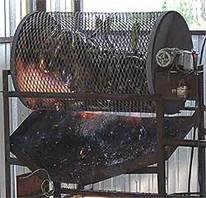
David Welch of Pennysylvania built a version of my roaster, below (he used a stainless steel cage). Nice work, David!

Also, Jhett Brown has an excellent article on roasting chile in a barrel roaster over at https://www.farmerschilemarket.com/how-to-roast-hatch-chile-with-a-barrel-roaster/ -- thanks for the link, Jhett!
If you have a homebuilt chile roaster you’d like to show off, send me a picture or a link and I’ll put it on here on the page. Comments or questions are welcome too! Ian_Gravagne (at) baylor.edu